WordPress is one of the most popular content management systems (CMS) in the world. If you’re using cPanel for your hosting, install WordPress is a simple process. In this guide, I’ll walk you through the entire process of installing WordPress using cPanel.
Step 1: Log into cPanel
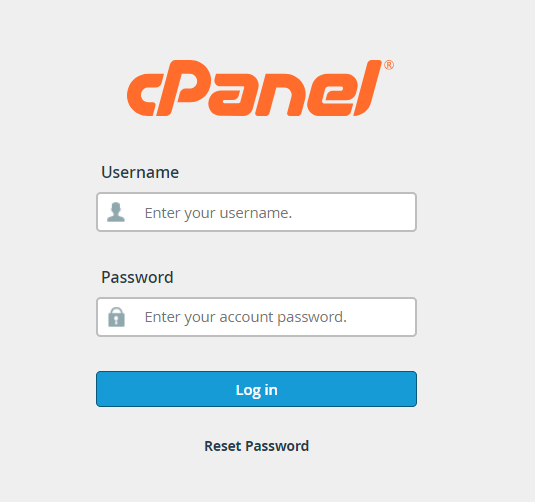
The first step to installing WordPress is to log into your cPanel account. You can usually access cPanel by typing in your domain name followed by “/cpanel” (e.g., www.yourdomain.com/cpanel).
- Enter your cPanel username and password.
- Once logged in, you will see the cPanel dashboard with several options and tools.
Step 2: Locate the “Softaculous Apps Installer”
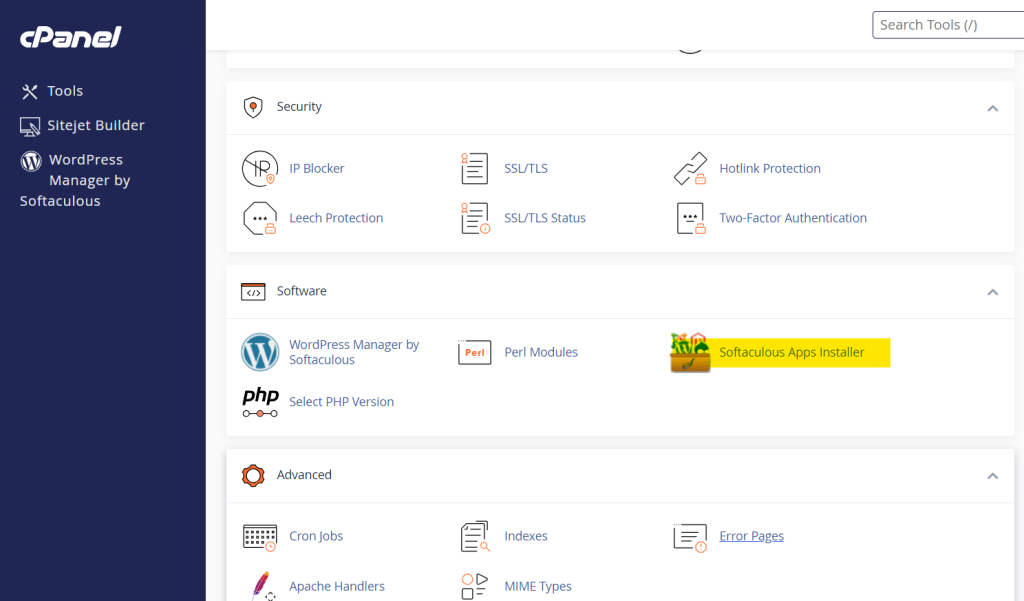
cPanel makes installing WordPress easy by providing the Softaculous Apps Installer. This tool allows you to install WordPress and other software applications with just a few clicks.
- Scroll down to the “Software” section of cPanel.
- Click on Softaculous Apps Installer or simply search for Softaculous in the search bar at the top.
- Once you’re in Softaculous, you’ll see a list of popular apps, including WordPress.
Step 3: Select WordPress from Softaculous

Softaculous includes several CMS and eCommerce applications, but in this case, you’ll want to focus on WordPress.
- Find WordPress in the list (usually, it’s at the top or under the “Blogs” category).
- Click on the WordPress icon to begin the installation process.
Step 4: Start the Installation Process
After selecting WordPress, you will be taken to an overview page that gives you some information about the software. You’ll also see an Install Now button.
- Click Install Now to proceed.

Step 5: Fill in Installation Details
You will now need to provide some information for the WordPress installation. Here’s a breakdown of the fields you need to fill:
a. Software Setup
- Choose the Version: Select the version of WordPress you want to install (it’s recommended to use the latest stable version).
- Choose Protocol: Choose whether you want your website to be accessible via http:// or https:// (it’s recommended to choose https:// if you have an SSL certificate).
- Choose Domain: Select the domain name on which you want to install WordPress.
- Directory: If you want to install WordPress in a subfolder (e.g., www.yourdomain.com/blog), enter the folder name here. If you want to install it in the root directory (e.g., www.yourdomain.com), leave this field blank.
b. Site Settings
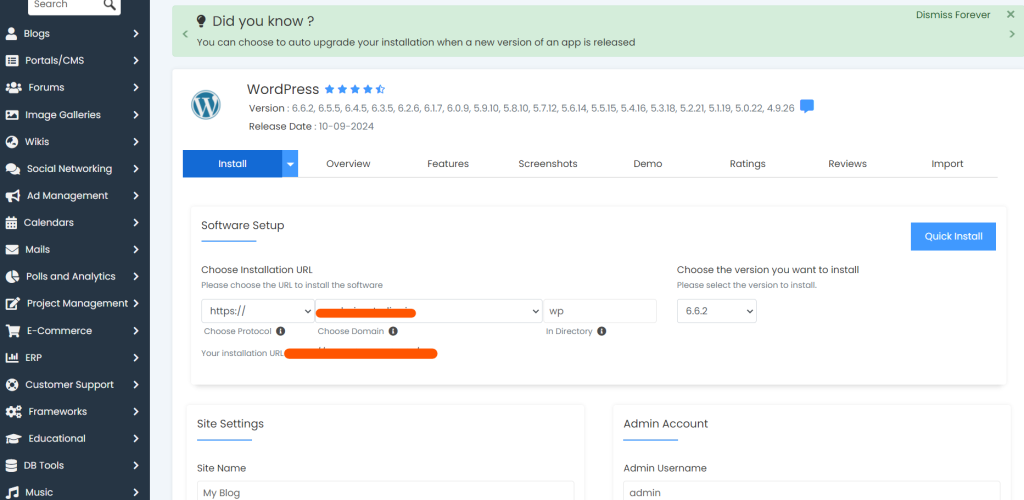
- Site Name: Enter the name of your website (you can change this later in WordPress).
- Site Description: Provide a short description of your website.
- Enable Multisite: If you want to run multiple WordPress sites from one installation, check this option (otherwise, leave it unchecked).
c. Admin Account
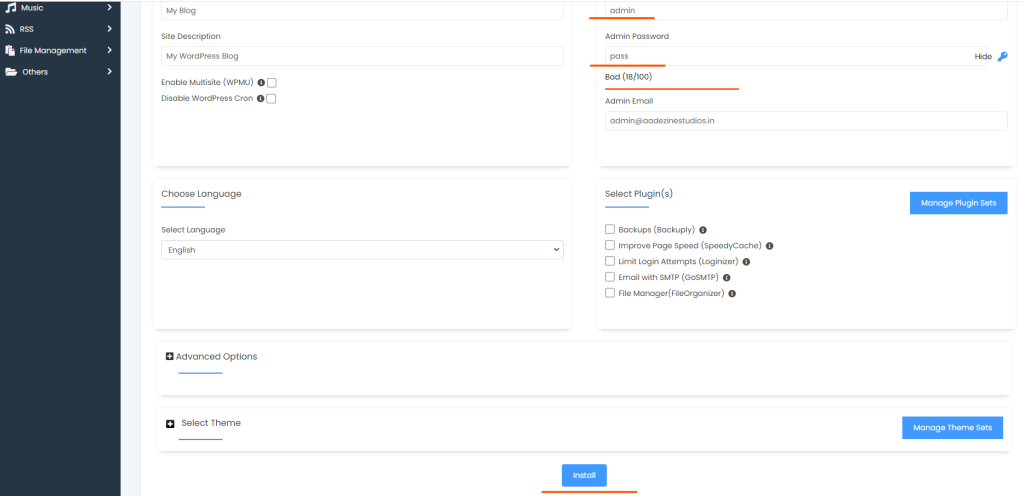
- Admin Username: Choose a username for your WordPress admin account (it’s best not to use “admin” for security reasons).
- Admin Password: Choose a strong password for your admin account.
- Admin Email: Enter the email address where WordPress will send notifications.
d. Language & Plugins
- Select Language: Choose your preferred language for WordPress.
- Select Plugins: You can choose to install optional plugins, such as a security plugin or a classic editor, during installation.
Step 6: Configure Advanced Options (Optional)
You’ll also have the option to configure some advanced settings, though this isn’t required. If you’re a beginner, you can skip this step.
- Database Name: You can specify a database name if you wish (it will be created automatically).
- Table Prefix: This is the prefix for all WordPress tables in the database (it’s good practice to leave it as “wp_”).
Step 7: Choose a Theme
During the installation, Softaculous will also allow you to select a theme for your WordPress site. A theme controls the appearance and layout of your site.
- Choose one of the available themes, or you can stick with the default theme and change it later through the WordPress dashboard.
Step 8: Install WordPress
After filling in all the required details, scroll down and click the Install button.
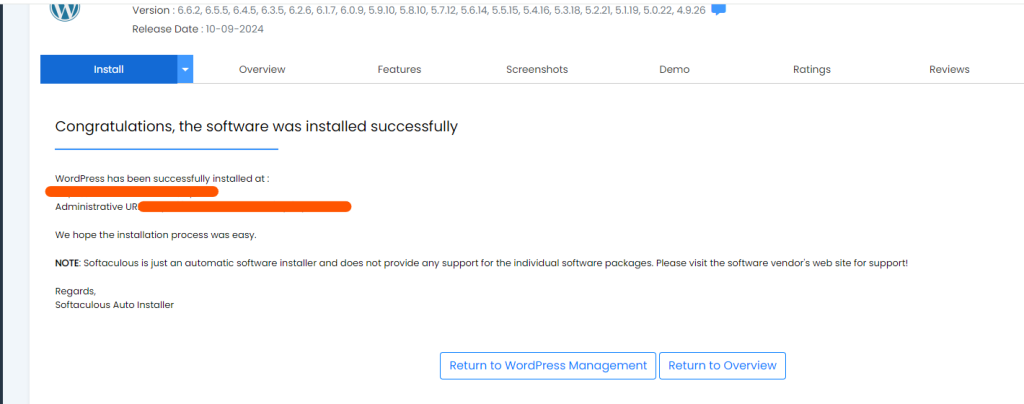
- Softaculous will begin installing WordPress. This process usually takes a few minutes.
- Once the installation is complete, you’ll see a success message along with the URLs to access your new WordPress site and its admin area.
Step 9: Access WordPress Admin
Once WordPress has been installed, you can log into the WordPress dashboard to start managing your site.
- The login URL will usually be www.yourdomain.com/wp-admin.
- Enter the admin username and password you set during the installation.
Step 10: Configure Your WordPress Site
Now that WordPress is installed, you can start configuring your site. Some initial things to do include:
- Install wordpress theme: You can find free and premium themes in the WordPress theme repository.
- Install plugins: Popular plugins include SEO tools, security plugins, and performance optimization tools.
- Set up pages and menus: Create your homepage, about page, and other key pages.
- Customize settings: Configure site settings such as permalinks, media, and reading options.
Conclusion
Install WordPress in cPanel is a straightforward process, especially with the help of tools like Softaculous. By following the steps outlined in this guide, you’ll have your WordPress site up and running in no time. After installation, spend some time familiarizing yourself with the WordPress dashboard and customizing your site to meet your needs.